Jim Cowan is uniquely placed to advise on emergencies, having successfully disengaged from over 300 canopy entanglements.
Drawing on decades of experience, he breaks down every possible outcome of a two out scenario and exactly what to do for each one.

Photo by Jim Cowan
Here is a compilation of techniques and options to address some of the most challenging and life-threatening situations that a ram-air parachutist may encounter. These are moments when pulling the cutaway handle is not the first thing to do, and in fact, may be a fatal mistake.
Disclaimer
The techniques and options proposed in this article are subjective and should be treated as guidelines only. No two situations or canopy types and loadings are exactly alike; therefore, no-one can foresee what the very best option will be for an infinite number of variables. Sometimes these situations can be so serious that no clear option may prevent serious injury or death.
- These subjects are often avoided or minimally addressed because they are rare with an infinite number of variables.
- The options and correct actions can be complicated and difficult to identify or discuss.
- Too much information syndrome (TMI) can paralyze a jumper with indecision from confusion with what the correct response is or fear of taking the wrong action.
- Very few instructors and jumpers have personal experience to share with others.

Photo by Performance Designs
Dual Deployments – having both containers open with infinite variations
Sources
This article is the collective wisdom gained from the following sources, with a few explanatory notes:
- US Army study on dual ram air canopies deployed – 1992
- Parachute Industry malfunction video ‘Breakaway’ – mid 90s
- Witness to 50 years of ram air canopy accidents including downplane landings resulting in permanent injuries and death.
- Personal experience landing a main/reserve entanglement followed by 9 more intentional dual canopy landings to create training videos.
- The smallest canopies I landed together were a 143 PD reserve with a 126 Lightning CF main, all others were large, lightly loaded similar construction canopy combinations 218pdr/260 Nav, 253pdr/PD 300, TR375/MS360.
- The techniques are still applicable to smaller, higher wing loadings but are much twitchier to control in less than normal angles of attack and speeds. Some small, highly loaded tri-cell main / 7-cell low aspect ratio reserve canopy combinations may be nearly impossible to land together safely in some situations.
- It may require releasing the brakes on the slower canopy to make them more compatible, or some other creative solutions that may be needed for controlled horizontal flight with possibly less than preferred vertical speeds and angles.

Photo by Performance Designs
Common Causes of Dual Deployments
- AAD activation due to low pull or improper setting/maintenance.
- Dislodged reserve ripcord pin due to leaning back on it in the aircraft or failure to inspect prior to donning. Always check all pins prior to putting them behind you.
- Main riser rake of the reserve ripcord pin either through or under the cover flap during an unstable, shoulder low, back to earth deployment.
- Pilot chute in tow malfunction and reserve activation usually releases tension on the main container allowing it to open as well, due to the common center flap.
- Collisions in freefall or during canopy flight can snag handles and break or cut closing loops.
Possible Results
Anything could have happened behind you as the canopies deployed. Usually one slider inflates before the other, potentially causing the next deployment devices to pass through a line group or individual line of the first canopy to deploy, thereby creating an entanglement of the canopies. You could end up with:
- Both canopies deployed without entanglement.
- Both canopies deployed with some form of entanglement.
- One or both canopies inflated and controllable.
- One or both canopies inflated and uncontrollable.
- Neither canopy inflated (get one out of a bag and/or assist with its inflation)
Typical Configurations
- A. Side by side
- B. Biplane
- C. Downplane
- D. Partially deployed

Photo by Performance Designs
Common Responses for all Configurations
1. Check for entanglement!
The most common mistake jumpers make in this situation is to cutaway the main prior to checking carefully for any form of entanglement. This could be fatal.
- Inspect risers and suspension lines to be 100% certain that neither parachute has passed through the riser line groups or individual lines of the other.
- Inspection should take a minimum of 20 seconds or likely longer to be 100% certain.
- Look carefully at how risers are crossing other risers.
- There are 8 separate riser/line groups to check for continuity.
- The risers that are crossing in the center directly above or in contact with your head (in the side by side configuration) should be compressing against one another, from front to back, if they are ‘not entangled’.
- Main risers passing through a reserve riser may possibly clear the reserve if cutaway, but stand a good chance of snagging the reserve, rendering it uncontrollable.
- Reserve risers passing through a main riser will cause it to slide all the way up the reserve lines completely collapsing the reserve, leaving the jumper suspended by the one main riser of the streamering main.
- Ensure the deployment devices of either canopy are not entangled with the other canopy as this may prevent safe separation of the canopies prior to cutaway of the main.
- The reserve ‘freebag’ deployment system is not attached to the canopy and should not be visible. If it is visible, it is probably entangled with the suspension lines of at least one of the canopies, possibly making separating the canopies detrimental.
2. Do not release the brakes!
The most common mistake jumpers make in this situation is to release the brakes.
- Keep the brakes set on both canopies to keep them flying and descending slower, making them more docile and easier to control and land if required.
- Use rear risers to control and steer them both.
- If the brakes have already been released on one of the canopies, keep the toggles in hand and go to half brakes, simulating the brakes still being set.
- Keep the canopies flying at the same speed and steer towards the other to keep them touching directly overhead.
3. Cutaway the main and land the reserve whenever possible or practical
It is safer to get rid of the main and land the reserve alone if they meet all prerequisites.
For this article, I will use 1,000 feet as an approximate minimum altitude to have completed the inspection for entanglement and cutaway the main. Once below 1,000 feet, there may not be time to complete the inspection, separate the canopies into a downplane, cutaway the main, then gain control of the reserve to make a safe landing.
Configurations and Scenarios
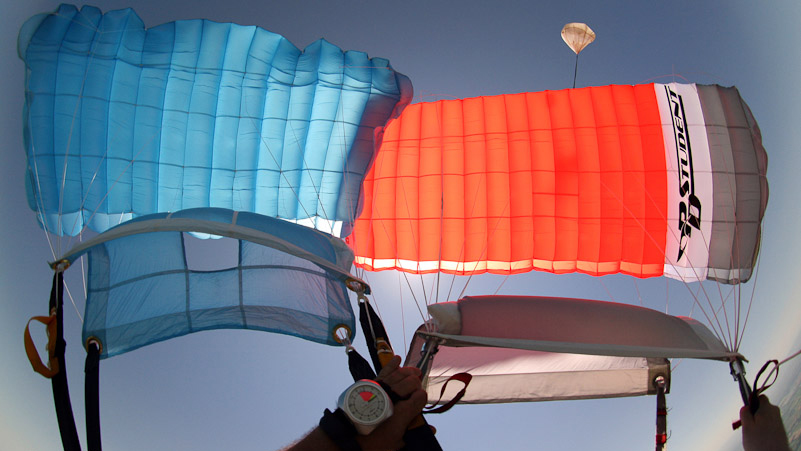
Photo by Performance Designs
A. Side-by-side
The canopies are flying alongside one another in the same direction. This is the most common configuration and usually results if the reserve deploys before the main. This may be due to the longer lines or higher forward speed of the main.
Above 1,000 feet and 100% certain the canopies are ‘not entangled’
- Separate the canopies and cutaway the main.
- Use the left hand, on the left rear riser of the left canopy – left on left of the left.
- Right hand peel the velcro on the cutaway handle.
- Separate the canopies into a downplane by pulling on that left rear riser.
- Once the canopies are about one canopy width apart, cutaway the main and let go of the riser.
- Gain control of the reserve.

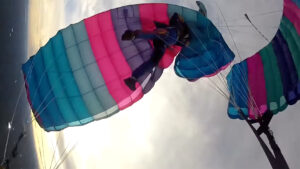
Side by side configuration, with risers crossing
Photo by Jim Cowan
Below 1,000 feet or canopies ‘are entangled’ or ‘uncertain’ if they are entangled
- Control the canopies and land safely with both of them.
- Grip the inside/crossing rear risers located just above the head and put a small amount of pressure on each of them equally, keep the nose of both canopies even.
- Cause the canopies to gently turn slightly toward each other preventing them from separating into a downplane.
- Steer by ‘pushing’ one canopy towards the other in the desired direction.
- Turn towards the other canopy, never away.
- Glide ratio is usually very high due to high aspect ratio of two canopies spanwise.
- Glide slope is shallow (up to 4 / 1) and airspeed is near normal.
- Do not attempt to flare either or both canopies, just keep them touching overhead and plf, slide or run if favorable.
- “The side-by-side wants to glide”

Photo by Brian Pangburn
B. Biplane
The canopies are flying one in front of the other in the same direction. This usually results if the main deploys before the reserve. This may be due to the shorter lines or lower forward speed of the reserve.
Above 1,000 feet and 100% certain the canopies are ‘not entangled’
- Be certain that the pilot chute of the front canopy (usually the main) is not under the bottom skin (in the lines) of the rear canopy,
- Separate the canopies and cutaway the main.
- Use the left hand, on the left rear riser of the rear canopy – left on left of the rear.
- Right hand peel the velcro on the cutaway handle.
- Separate the canopies into a downplane by pulling on that left rear riser.
- Once the canopies are about one canopy width apart, cutaway the main and let go of the riser.
- Gain control of the reserve.

Photo by Jim Cowan
Below 1,000 feet or canopies ‘are entangled’ or ‘uncertain’ if they are entangled
- Control the canopies and land safely with both of them.
- Gently and slowly steer the front canopy using its rear risers.
- Keep the rear canopy pressing on the lines of the front canopy to prevent a downplane.
- If needed, use the rear risers of the rear canopy to align it with the front canopy.
- Glide ratio is usually very low due to unnatural angle of attack for each canopy.
- Glide slope is steep (approximately 1/1) and airspeed is low.
- Do not attempt to flare either or both canopies, just keep them touching overhead and plf, slide or run if favorable.
- The biplane wants to go slow and does not glide well.

Photo by Performance Designs
B2. Offset Biplane
This is the same as the biplane above except that the rear canopy is not aligned directly behind the front canopy and is instead ‘offset’ to the left or right.
Above 1,000 feet and 100% certain that canopies are ‘not entangled’
- Rear canopy offset left; follow same procedure as biplane above.
- Offset right; move the rear canopy to center using the left rear riser of the rear canopy and stop, then move it left the rest of the way into the downplane position and cutaway the main.
Below 1,000 feet or canopies ‘are entangled’ or ‘uncertain’ if they are entangled;
- Rear canopy offset left; gently steer the front canopy with rear risers making all left turns towards the offset canopy in the rear.
- Offset right; gently steer the front canopy with rear risers making all right turns towards the offset canopy in the rear.

C. Downplane
The canopies are flying in opposite directions, resulting in a vertical or near-vertical dive towards the ground. Usually, one canopy is directly in front of the jumper and the other directly behind. This results when at least one canopy has a slight turn due to line twists or any other defect that can cause a slight turn in either canopy.
Above 1,000 feet and 100% certain the canopies are ‘not entangled’
- Look at the main risers and be certain they have a clear path to release and depart.
- Just because they are downplaned does not always mean they are not entangled.
- The canopies can downplane and be entangled as well, so you must check.
- If the canopies are in line with the harness main lift webs (usually directly in front and back), this is a good sign they are usually not entangled.
- Conversely, if the canopies are not aligned with the harness, this could be a sign that they are entangled in some way (but not always).
- Cutaway the main canopy if all criteria are met as specified.
Below 1,000 feet or canopies ‘are entangled’ or ‘uncertain’ if they are entangled
- Control the canopies and land safely with both of them
- Create horizontal flight by turning both canopies toward each other to the same side.
There are four ways to do this;
- Use a rear riser of each canopy on the jumper’s same side and turn them toward each other until they are touching overhead.
- If unable to reach or pull the rear risers, use a toggle from each canopy on the jumper’s same side to turn the canopies toward each other until they are touching overhead.
- If unable to bring the canopies together into horizontal flight, pull both toggles of the front canopy into deep brakes to slow as much as possible. Force the other canopy to be lower than the jumper in an inverted position, reducing the vertical dive to be as horizontal as possible.
- If unable to achieve an acceptable pitch angle toward the ground, pull one toggle and steering line of one of the canopies, hand over hand until you grasp the fabric of the corner of the tail and collapse it into your arms to create horizontal flight with the other canopy.
D. Partially Deployed
One canopy has deployed and the other container is open as well. The most common mistake jumpers make in this situation is to allow the reserve to inflate by flying fast or not firmly grasping the bagged reserve or its bridle. You must decide whether you can prevent the reserve from deploying or letting it deploy not knowing whether it has passed through a line group. Do not rely on holding it between your legs or behind your chest strap or in your jumpsuit. Hold onto it like your life depends on it – cause it just might!
Reserve canopy is open with the un-inflated main canopy hanging below
- Ensure the open canopy is the reserve and not the main.
- Check the risers to ensure the reserve did not pass through a main riser or suspension line during deployment.
- Cutaway the main then assist the 3rings to flip and the risers to clear due to lack of tension on them when un-inflated.
Main canopy is open and the reserve container is open with only the reserve pilot chute trailing behind
- Do not release the brakes if still set.
- Fly slowly at half brakes if brakes have already been released.
- Prevent the reserve from deploying if main is good.
- Reach back with one hand and grasp the reserve bridle line.
- Hold it firmly but do not pull on it or reel in the reserve pilot chute. Let it trail.
- Steer with the rear riser of the free hand and/or with the harness.
- Drop the bridle at 30 feet above the ground.
- Perform a rear riser flare and plf landing.
Main canopy is open, the reserve container is open, reserve canopy still in the bag
If the bagged reserve canopy falls out of the container with a skyhook still holding onto the freebag bridle, it will be suspended by the bridle with the pilot chute trailing from the reserve container.
- Carefully grasp the bridle and lift the bagged canopy into your arms holding it firmly.
- Do not pull on the bridle or reel in the pilot chute, just hold the bag firmly.
- Steer with the rear riser of the free hand and/or with the harness.
- Drop the bagged reserve at 30 feet above the ground.
- Perform a rear riser flare and plf landing.
Main canopy is open, the reserve container is open and reserve lines partially deployed
If the bagged reserve falls out of the container and all of the suspension lines have deployed except for the locking stows on the freebag;
- Gently grasp all of the reserve suspension lines and gently lift the bagged reserve while making neat coils with the lines until the bag is in your arms holding is firmly.
- Do not pull on the bridle or reel in the pilot chute, just hold the bag firmly.
- Steer with the rear riser of the free hand and/or with the harness.
- Drop the bagged reserve at 30 feet above the ground.
- Perform a rear riser flare and plf landing.
- If the bag comes off the reserve before getting it into your arms, neatly uncoil the suspension lines ensuring they are all clear your equipment.
- Turn away from the reserve with a rear riser of the main to cause the reserve to inflate as quickly as possible, without releasing the brakes.
- Get them into a configuration and perform the appropriate procedures.

Photo: Optimum reserve landing, by Michael McGowan
Reserve Static Lines – RSL
Most RSLs do not have a negative impact on any of the dual deployment situations discussed, because the reserve container is already open prior to pulling the cutaway handle and releasing the main risers. However, jumpers should refer to their rig manufacturers’ suggestions because they may require releasing the RSL prior to cutting away the main. These include;
- Double guide ring (RSL ring between them with the reserve ripcord passing through all 3 of the rings).
- 2-sided or both risers (RSL connected to each riser pulling the reserve ripcord cable through a break in its housing).
Double guide ring

Photo by Jim Cowan
A double guide ring RSL could allow the reserve ripcord pin to be positioned between the guide rings, preventing the RSL from bending the reserve ripcord cable and releasing the attached riser. Pulling the reserve ripcord the rest of the way would release the main.
2-sided RSL
A 2-sided RSL could slide up the reserve suspension lines, completely collapsing the reserve canopy if the reserve deploys before the main. This is extremely dangerous in a pilot-in-tow malfunction if the jumper performs cutaway procedures and the main deploys after the reserve inflates. Once this happens, the jumper has no recourse.
Hook Knives

Photo by Adrian Bowles
A hook knife is a precision instrument. Use it with precision. The knife can be a useful tool if used properly, but can be deadly if used improperly.
- A single line snagged on a jumper or equipment would be an appropriate use.
- Never slash or swipe with a hook knife. Pluck instead.
- Most jumpers will cut the wrong thing or too many of the right things if they panic and start slashing, possibly making a situation worse with no recourse.
- Anything under tension will cut easily.
- Anything not under tension will need to be placed under tension to cut.
Summary
These are unusual canopy emergencies that may require creative responses. Get busy but don’t panic and just start pulling handles. Assess, decide and execute. You have the rest of your life to fix the problem, keep working the problem. Never give up.

Photo by Josh Seagrave
Wraps and entanglements
Read more by Jim Cowan on what to do in the case of an entanglement or wrap.